| Field
|
Type
|
Description
|
| header
|
Element
|
Set of the elements associated with the header of a form.
|
| footer
|
Element
|
Set of the elements associated with the footer of a form.
|
| submit
|
Element
|
Set of the elements associated with the submit button on a form.
|
| cancel
|
Element
|
Set of the elements associated with the cancel button on a form.
|
| agreement
|
Element
|
Set of the elements associated with the agreement for using a form.
|
| paymentOptionInformation.header
|
Element
|
Set of the elements associated with the header of the paymentOptionInformation section of a form.
|
| paymentOptionInformation.footer
|
Element
|
Set of the elements associated with the footer of the paymentOptionInformation section of a form.
|
| transactionInformation.header
|
Element
|
Set of the elements associated with the header of the transactionInformation section of a form.
|
| transactionInformation.footer
|
Element
|
Set of the elements associated with the footer of the transactionInformation section of a form.
|
| cscHint
|
Element
|
Set of the elements shown next to the Card Security Code (CSC) entering field.
|
6) The
Element structure includes the following attributes:
| Attribute
|
Type
|
Description
|
| label
|
String
|
Text that is going to be shown for an element. Note: If the label attribute is associated with the agreement attribute, the value is required to be always preceded by a space sign ( ). This is needed to insert a checkbox so a card/account holder could accept terms and conditions of the payment. For example, agreement.label: " [agreement text]"
|
| image
|
String
|
Image that is going to be shown for an element.
|
| style
|
String
|
Style of an element.
|
| cscHint.label
|
String
|
Text that is going to be shown next to the Card Security Code (CSC) entry field.
|
| cscHint.link
|
String
|
URL where a user is going to be redirected when clicking on the label.
|
| cscHint.style
|
String
|
Style of the window opened when clicking on the URL.
|
Page Profile Examples
Logic in development
1) The general view of the profile looks as follows (for the entire sample of the profile, follow
this link):
var profile: {

  	field: {
		amount: {
			label:"Amount",
			required:true,
			readonly:false,
			default:""
		},
		street: {
			label:"Street",
			required:true,
			readonly:false,
			default:""
		},

		city: {
			label:"City",
			required:true,
			readonly:false,
			default:""
		},

		holderName: {
			card: {
				label: "Cardholder Name ",
				required:true,
				readonly:false,
				default:""
			},
			account: {
				label: "Account Holder Name  ",
				required: true,
				readonly: false,
				default:""
			}
		},

		accountNumber: {
			card: {
				label: "Card Number ",
				required: true,
				readonly: false,
				default:""
			},
			account: {
				label: "Account Number  ",
				required: true,
				readonly: false,
				default:""
			}
		},

		accountAccessory: {
			card: {
				label: "Expiration Date ",
				required: true,
				readonly: false,
				default:""
			},
			account: {
				label: "Routing Number ",
				required: true,
				readonly: false,
				default:""
			}
		}
	},

	form: {
		card: {
			header: {
				label: "Secure Payment Form"
			},
			footer: {
				label: "Powered by <a id:\"link\" target:\"_blank\"/>"
			},
			submit: {
				label: "Charge Credit Card"
			},
			style: "color:black"
		},

		account: {
			header: {
				label: "Secure Payment Form"
			},
			footer: {
				label: "Powered by <a id:\"link\" target:\"_blank\"/>"
			},
			submit: {
				label: "Charge Account"
			},
			style: "color:white"
		}
	}
};
2) Let’s imagine that we need to hide the CSC field and set the amount of $10 by default. In this case, the corresponding piece of the code will look as follows:
var profile = {

	field: {
		amount: {
			label:"Amount",
			required:false,
			readonly:false,
			default:"10000"
		},
		csc: {
			label:"",
			required:false,
			readonly:false,
			default:""
		}
	}
};
3) Let’s imagine that we need to change the names of the paymentOptionInformation and transactionInformation sections for the card processing payment page. In this case, the corresponding piece of the code will look as follows:
var profile: {

	form: {
		card: {
			header: {
				label: "Secure Payment Form"
			},
			footer: {
				label: "Powered by <a id:\"link\" target:\"_blank\"/>"
			},
			submit: {
				label: "Charge Credit Card"
			},
			style: "color:black"
		},
			transactionInformation: {
				header: {
					label: "Your Transaction Info"
				},
				footer: {
					label: " * Indicates required fields"
				},
				header: {
					style: "color:grey"
				}
			},
			paymentOptionInformation: {
				header: {
					label: "Card Information"
				},
				footer: {
					label: " * Indicates required fields"
				},
				header: {
					style: "color:grey"
				}
			}
		}
};
The gateway allows to customize pages in two modes - standard and advanced. In rare occasions when standard customization is not enough, and it is necessary to change the layout and behavior of the pages drastically, the advanced customization may be used.
HPP Customization
Basic Customization (development in progress)
Basic customization is used when it is necessary to change the functionality of the pages (for example, validation, page behavior, etc.). For this type of customization, the following files are used:
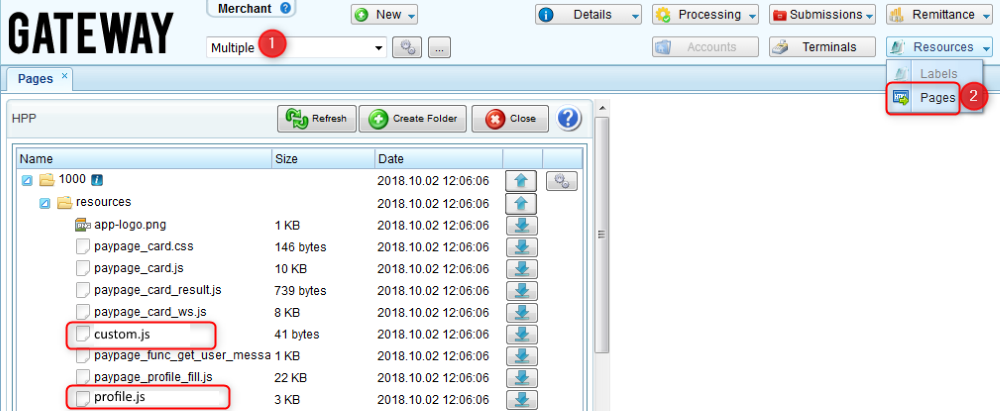
- custom.js – a script used for merchant/account’s pages customization (validation, custom scripts, etc.).
- custom.css - a style sheet used for the addition of custom styles to a merchant’s pages.
If it is necessary to customize the pages of a merchant/account using the standard methods, follow these rules:
1. By default,
all default pages are available for every merchant. For this reason,
you don’t have to download them. You can call them with an
API request.
2. For a merchant/account to process through the customized pages, use two scripts - profile.js and custom.js:
- if it necessary to change labels and add your own text, use profile.js;
- if it is necessary to change validation and drastically change the layout of a page, use custom.js.
3. Depending on the level of customization, download the script you need, modify it, and upload to the directory of the merchant/account.
4. If you need to add your own CSS styles, use a custom.css style sheet by uploading it to the directory of the merchant/account.
Detailed steps are described in the
General Customization via UI section.
Advanced Customization
You can customize pages in an advanced way via modification of the default pages or adding your own pages to a merchant/account.
If it is necessary to customize the pages of a merchant/account using the advanced methods, follow these rules:
1) Custom pages, which are HTML files, are configured and modified through the uploading process to the merchant’s/account’s directory on the user interface:
- if the merchant/account already has customized pages, they are uploaded to its directory;
- if there are no customized files, then default pages can be used as templates. In this case, default pages must be copied to the merchant/account, then be downloaded, modified and re-uploaded.
Please refer to the
guidelines below to learn when customization is appropriate and when default pages should be used.
2) By default, the HPP pages are placed in the directory 1000; they are available for all merchants when calling a particular operation. The behavior of these pages can be completely or partially overridden:
- if custom pages are uploaded at the account level, they override the merchant’s pages and are available for the account they are uploaded to;
- if custom pages are uploaded at the merchant’s level, they expand the scope automatically to all of that particular merchant’s accounts where no pages are set up;
- if all 5 HTML files are uploaded, then all default pages are overridden. However, if only a few from the whole set are uploaded, for example, 2 of 5, then these 2 override the default pages and the remaining 3 default pages will continue to be used.
Let’s review a typical business scenario as an example of the default pages overriding:
Use case
Let’s assume that we have a merchant who only accepts card payments. There is a need to change the layout of the pages that it’s going to use. For this purpose, paypage_card.html and tokenization_card.html pages be customized, while paypage_account.html, tokenization_account.html and result.html can be left as is. To do so, it is necessary to extract the paypage_card.html and tokenization_card.html pages from the downloaded archive with the default templates, customize them and re-upload them. After this, the paypage_card.html and tokenization_card.html pages will be displayed with the updated layout, while paypage_account.html, tokenization_account.html and result.html remain set by default.
Detailed steps are described in the
Advanced Customization via UI section.
Customization Rules
When customizing your hosted payment pages, it is important to follow these rules:
Encoding
Uploaded HTML files must be saved as
UTF-8 and encoding within them must be
UTF-8 as well. The code within an HTML page will look as follows:
<meta http-equiv="Content-Type" content="text/html; charset=UTF-8">
Adaptive design
- if it is necessary for a page to have an adaptive design, it must include a meta tag with the name=viewport attribute. The code within an HTML page will look as follows:
<meta name="viewport" content="width=device-width, initial-scale=1">
- if it is necessary to record the fixed length of a table or any other component, it must be done by using the max-width CSS attribute, not the width attribute. A max value for the table length must be indicated. The code within an HTML page will look as follows:
Good example:
<table style="max-width: 500px">
Bad example:
<table width="500px">
Convenience Fee
If a merchant wants to collect convenience fees from its customers when processing through HPP, it must have this feature
activated within a provider profile. If set, every time when an HPP is rendered, it has a transitional page allowing to calculate convenience fee. The difference between this page and a standard one is that it does not have a field for entering a transaction amount and getting to the next page is available by clicking the
Calculate Charges button. On the next page, information about the transaction amount and a charged convenience fee is shown. Further processing through the hosted payment page goes as usual.
Resources
All customization elements, such as images, JS scripts and CSS files, are uploaded to the /resources directory of a merchant/account via the user interface. Note that all resources which are not placed in the /resources directory will not be included in the hosted payment page.
Style URL
If there is a need for a page to contain different designs, depending on which operation is made or which product/service is purchased, it can be performed by applying a dynamic style via style URL. This URL is indicated as a parameter within an API call and can reference either an internal CSS file located on the server, or an external one. It can include a relative path (link to the internal file) or an absolute path (link to the external file). However, usage of the absolute path can be dangerous from a security perspective. For this reason, it can be prohibited from use by enabling the unipay.system.absolute-style-path-allowed system property.
Resource Path
The links to the uploaded files can be indicated as an absolute or relative path. For example:
<script language="JavaScript" src="https://$UNIPAY/resources/hpp/1000/paypage_card.js"></script>

<script language="JavaScript" src="https://$UNIPAY/resources/hpp/$ACCOUNT_ID/profile.js"></script>
<script language="JavaScript" src="/resources/hpp/1000/paypage_card.js"></script>

<script language="JavaScript" src="/resources/hpp/$ACCOUNT_ID/profile.js"></script>
If an absolute path is used, the page can be called from both UniPay and UniBroker. Regardless of the place where the page is called from, it is always rendered on UniPay. In the path to the resources, it is possible to set a domain, where the resources are located. For this purpose, the following variables are used:
- $UNIPAY – when this variable is used, it is replaced with the domain name of the UniPay server. The domain name is taken from the API request.
This means that if a request is submitted to the UniBroker server
https://unibroker.your-server.com or UniPay server
https://unipay.your-server.com, and the path to the resource is set as
https://$UNIPAY/resources/hpp/..., then the path which the resource is referred to will always be
https://unipay.your-server.com/resources/hpp/... .
- $UNIBROKER – when this variable is used, it is replaced with the domain name of the UniBroker server. The domain name is taken from the system settings (System perspective => System => Settings => Services => UniBroker).
This means that if a request is submitted to the UniBroker server
https://unibroker.your-server.com or UniPay server
https://unipay.your-server.com, and the path to the resource is set as
https://$UNIBROKER/resources/hpp/..., then the path which the resource is referred to will always be
https://unibroker.your-server.com/resources/hpp/... .
- $ACCOUNT_ID - when this variable is used, it is replaced with an identifier of an account, which is a Folder Code (see screenshot). It allows for an account ID to not be revealed in the HTML code of a page. If the directory code is not assigned, it is replaced with the account ID. This identifier is determined by the account used in the API request.
This means that if a path to resources looks like
…/resources/$ACCOUNT_ID/profile.js, the resources are taken from the profile of an account indicated in the API request.
Custom fields
If there is a need to submit custom fields to the gateway, then these fields must be preceded by an underscore sign (_). In this scenario, the fields will be submitted and stored to the database. For example, an integrator needs to send a
size parameter, which is not present in the API of UniPay. In this case, the parameter must be submitted as
_size.
Customization Guidelines
1) In cases where you are going to customize HPPs, it is recommended to define the scope of the necessary changes. This is needed to determine what customization to use - a standard one via the profile.js and/or custom.js scripts, or an advanced one via a change of the physical files. If you have any doubts if you need the advanced customization or simple setup is enough, address the issue to gateway support.
- if it necessary to change labels and add your own text, use profile.js;
- if it is necessary to change validation and drastically re-design the layout of a page, use custom.js. For example, you can add mode10 validation for credit cards.
- if profile.js and custom.js are not enough, use an advanced customization. This may be necessary if you want to drastically change the structure of the pages such as placement of the elements on the form, visual representation, etc. For example, dividing the fields into separate tabs.
2) To keep your paypages stable, we recommend using profile.js. Despite this script being an ordinary JavaScript file, we strongly discourage you from adding any JS scripts that were not initially there.
3) The profile.js includes fields for both card and account transactions. If you are going to perform only transactions of one type (for example, card), don't remove the fields for another one but simply comment this part of the code using the function.
4) There can be cases when advanced customization is needed. Generally, we discourage advanced customization because when it is used, it makes subsequent maintenance of the pages more difficult. Especially, when software updates are deployed.
4) It is not recommended to use external resources, such as JS scripts and images, for the following reasons:
- this can pose a security threat in cases of if a remote server is compromised;
- external resources can be accidentally removed, and as a result, your page will be displayed incorrectly.
5) Do not change the IDs of the components because they are connected with JS scripts and API fields. In cases when a component ID has been changed, the field will not be processed correctly when submitted to the gateway.
6) When customizing a payment page, it is strongly recommended to change only the page layout. Follow this guideline if more comprehensive changes are needed:
- to change a page’s style, use CSS files;
- to submit any parameters that are not a part of the standard API, use custom fields;
- to change a company’s name, logo, etc., use a branding profile.
7) After the JavaScript file has been changed, you can verify if your syntax is correct using a
designated validator.
HPP Customization via the User Interface
General Customization via the User Interface
The steps of applying a general customization are as follows:
1) Download a necessary script (profile.js, custom.js, or both) from the merchant 1000 to your computer.
2) Modify the files according to your needs.
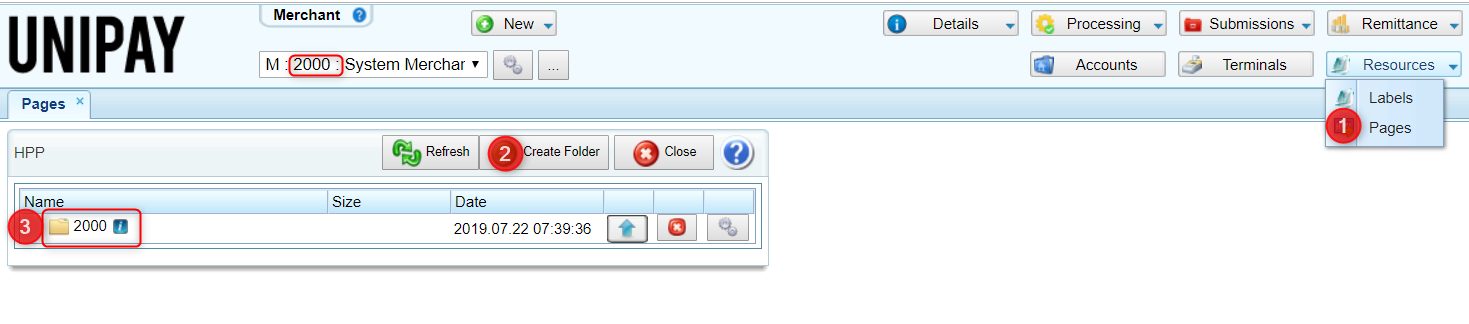
3) Go to the user interface and create a directory where HPP files are going to be stored. The directory must be created for a merchant or account with the corresponding to the merchant or account ID.
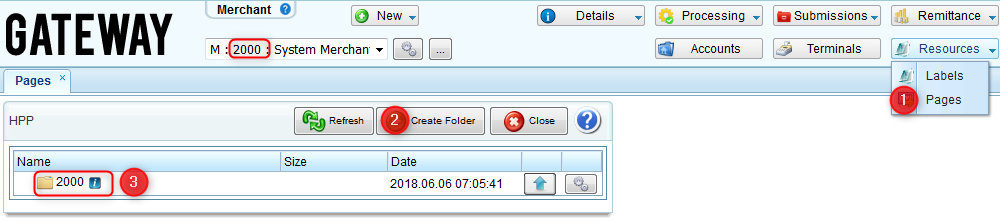
4) Create the
resources directory.
5) Upload the customized files from your computer to the
resources directory.
6) Remove HPP files if they are no longer needed using the
Remove button on the user interface. Please note that the default payment pages cannot be removed.
7) To verify if the uploaded pages work correctly, submit the
API request.
Advanced customization via the User Interface
The steps of applying an advanced customization are as follows:
1) Create a directory where HPP files are going to be stored. The directory must be created for a merchant or account with the corresponding to the merchant or account ID.
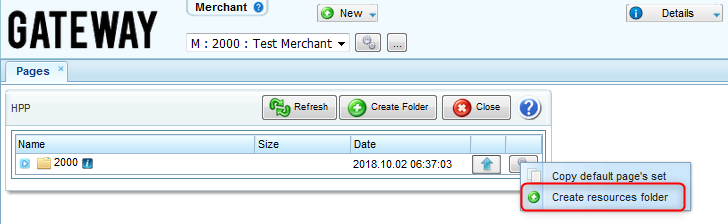
2) If the merchant/account is going to use or customize default pages:
- copy default pages
- download them to a local directory on your computer
- modify the HTML files
- re-upload them through the user interface

3) If the merchant/account is going to use its own pages which have already been customized:
- upload the pages through the user interface

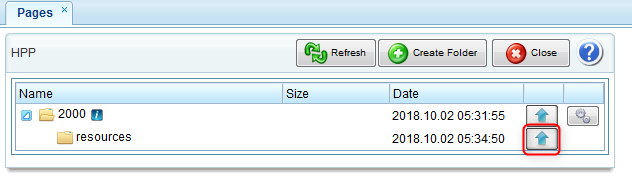
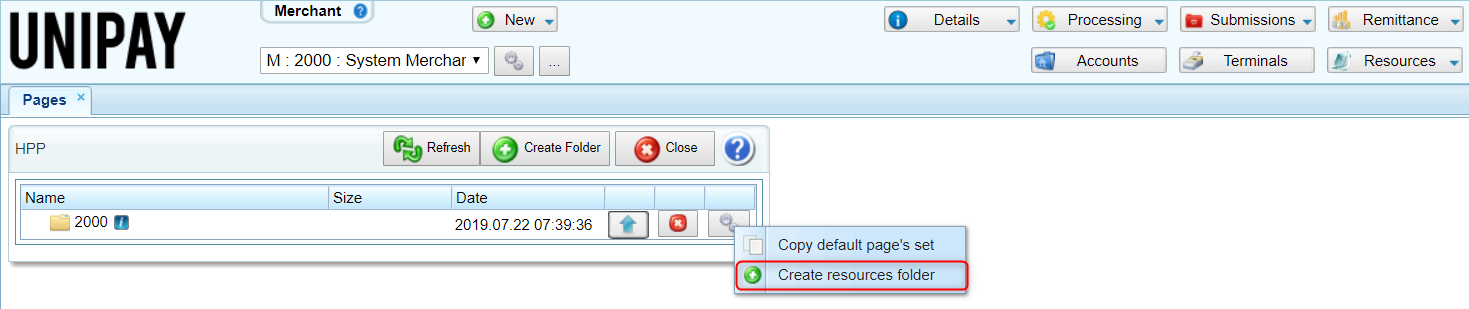
4) Create the /resources directory and upload the elements associated with the HPP:
- if the default pages have been copied to the merchant/account, the /resources directory is created automatically;
- if customization is done from the scratch, the directory must be created manually.
5) Remove HPP files if they are no longer needed using the
Remove button on the user interface.
6) To verify if the uploaded pages work correctly, submit the
API request.
7) For more detailed steps, review
this tutorial.
Using the Adobe DTM Analytics Tagging in HPP
Marketing tags on HPP can be used to create analytics triggers, to track events, etc. From a technical perspective, the tag is a java script. The tool that allows you to work with marketing tags is called Adobe Dynamic Tag Management.
The
<! - include src = name.js -
> tag is included in HPP html code. Every time when the HPP is opened, the code from embedded
name.js file is executed. The file
name.js should be placed in a predetermined merchant´s directory on the local server (or in default merchant directory). If there is no file there, the tag is skipped. Adobe Dynamic Tag Management mechanism is supported for the following HPPs:
- gift_card.html
- paypage_account.html
- paypage_card.html
- result.html
- tokenization_account.html
- tokenization_card.html
Error Messages
There may be cases when an integrated platform needs to implement their own error messages, which a customer sees when performing transactions through the hosted payment page. For this purpose, the error message override mechanism is used. To learn about the mechanism review
this section of the guide.
Error Messages Overriding
There can be cases when an integrator prefers to use their own error messages instead of the gateway-generated ones. For this purpose, the error message overriding mechanism is used. This mechanism works as follows:
- an integrator can override default user messages within the API with the custom messages;
- default user messages are overridden using associated error codes and developer messages, which contain dynamic parameters within the default messages;
- for the real-time API, an integrator can replace default user messages with custom ones using JavaScript in their own application.
- if you need to replace default user messages with custom ones on HPP, the gateway provides the architecture described in the Custom Messages Implementation via HPP section.
- note that only error codes can be overridden using this mechanism.
Use Case
When a PSP works with an integrator/software platform, there may be cases when default error messages are not suitable for the software platform because of the wording. To override gateway error messages displayed within API or on hosted payment pages, the integrator uses developer message mechanism and replaces user messages that do not correspond to its needs.
Custom Messages Implementation via HPP
1) To override the user messages on the payment pages, it is necessary to implement the
getUserMessage function in HPP files located in the directory of the corresponding reseller/merchant (for example,
/resources/hpp/2000). The function can be either embedded in the payment page or placed in an external JavaScript file that must be connected to the corresponding payment page.
| String getUserMessage(String accountType, String code, String userMessage, String params)
|
This function overrides user error messages with code as an error code, userMessage as an error message, and params as parameters included in the error message. Additionally, an accountType parameter can be used to return custom messages depending on the payment option used in the request.
Returns custom error messages.
Note: If overriding of a particular error message has been specified in the function, a custom error message is shown on the payment pages. Otherwise, a user message is displayed.
|
2) All custom messages desired by the integrator must be specified within the function. The following response messages can be overridden by the function:
3) To have custom messages displayed on HPP, the
User Message + Developer Message + Hint option must be selected in the
Response Msg Display Policy setting on the User Details form associated with the service user used by the software platform.
Recommendations
User messages can be customized using the getUserMessage function in the following ways:
- Add if statements for each error code associated with the messages that should be overridden and add custom messages. For example:
if (code == 'S25') {
   if (params['object'] == 'Tokenization') {
      return 'Tokenization issue';
   } else if (params['object'] == 'Encryption') {
      return 'Encryption issue';
   }
}
- Add if statements for fields where an error may occur. For example, when a separate message should be shown in the case of an invalid value within the amount field, the following construction can be used:
if (code == 'F25') {
   if (params['field'] == 'amount')
   return 'Amount is invalid';
   }
- Add if statements for each payment option type to specify that a routing number/expiration date or account number/payment card number is invalid depending on the value within the accountType field. For example:
if (code == 'F21' || code == 'V21') {
   if (params['field'] == 'accountAccessory') {
      if (accountType == 'C' || accountType == 'S')
      return 'Routing number is invalid';
      else
      return 'Expiration date is invalid';
      }
}
Implementation Example
function getUserMessage(accountType, code, userMessage, params){

    if (code == 'S25') {
        if (params['object'] == 'Tokenization') {
            return 'Tokenization issue';
        } else if (params['object'] == 'Encryption') {
            return 'Encryption issue';
        }
    }

    if (code == 'F25') {
        if (params['field'] == 'amount')
            return 'Amount is invalid';
    }

    if (code == 'F21' || code == 'V21') {
        if (params['field'] == 'accountAccessory') {
            if (accountType == 'C' || accountType == 'S')
                return 'Routing number is invalid';
            else
                return 'Expiration date is invalid';
        }

        if (params['field'] == 'accountNumber') {
            if (accountType == 'C' || accountType == 'S')
                return 'Account Number is invalid';
            else
                return 'Card number is invalid';
        }
    }
    return userMessage;
}
Tokenization
Tokenization and Profiling
To avoid PCI audit and simplify work with payment cards and accounts, most software platforms and merchants prefer to delegate card/account data storage to payment service providers. For its part, a PSP can either have its own internal system for storage or delegate this to some service or processor. If the software platform wants to keep card/account data on the PSP’s side, it can use tokenization or profiling.
Tokenization is a mechanism allowing for the encryption of card/account numbers. As a rule, it is used by businesses, which store additional data associated with their customers (such as names, addresses, etc.) in the system integrated with the gateway. After a card/account number is encrypted, it is assigned with a
token, which is a value exclusively attributed to every card/account number as a result of encryption. The token is stored in the database of the gateway for further usage. Every token has a certain structure. To learn more about the token’s structure follow
this link.
Use case
SuperShop merchant, which is an online store, provides the service of selling subscriptions for a magazine. The merchant charges its customers a monthly fee per subscription. For this purpose, it needs to keep customers’ card numbers on file. Storage of the sensitive data in the database of the merchant makes its infrastructure more expensive. Additionally, regular PCI audits must be conducted. To avoid this, it is recommended that the merchant delegate card data storage to an external system using the tokenization mechanism. In this case, the external system retains card numbers internally and returns tokens associated with these numbers to the merchant to record within its system.
A token can be generated via API only. The call can be submitted as a separate request or within a hosted payment page (via adding the notifyURL parameter in the request). You can use the token returned in the response in any subsequent transactions (real-time/batch). The token generation mechanism works as follows:
- To have tokenization enabled, you must configure the tokenization provider profile.
- Tokenization can be performed in two ways:
- Via a separate operation. To have this done, submit the tokenization API call. A token value will return in the response.
- Within a transaction. To have this done, submit the sale/credit API call. Before having the transaction processed, the gateway generates a token for a submitted card/account number. This token is automatically populated in the API request, and the transaction is processed using not the raw data but using the token. The token value is returned in the response.
For some business scenarios, you may be required to submit not just information about a payment option but also some additional data associated with a customer (such as their name, address, etc.). For this purpose, profiling is used.
Profiling is a mechanism allowing for the encryption of card/account numbers along with storing all payment information associated with them in the form of a
token profile.
Use case
SuperShop merchant, which is an online store, provides the service of selling subscriptions for a magazine. The merchant charges its customers with a monthly fee per subscription. For this purpose, it needs to keep customers’ card numbers on file. The software platform that the merchant processes transactions through uses a legacy system, which allows it to store customers’ ID, date and amount of the subscription. However, the system cannot store any financial information. As the merchant cannot keep all data in the system of the software platform, it stores it in the external system. To allow for this, the profiling mechanism is used. Thus, the external system keeps card numbers and all customer data as a profile and returns tokens associated with these profiles to the merchant to record within its system.
The profiling mechanism works similar to the token generation mechanism with the following specifics:
- When a token is generated via profiling, the card/account number is stored along with all data associated with a customer.
- You can review customers’ data via the Tokens form under the Console and Merchant perspectives on the user interface.
Recommendations
- Tokenization may be used by businesses, which tokenize only card/account numbers and store other information about their customers (such as names, addresses, etc.) in an integrated system.
- Profiling may be used by businesses, which do not store any information about their customers in the integrated system. Therefore, all data is kept in the gateway.
- It is recommended to use tokenization over profiling. In cases of a customer updating their personal information (for example, the address or expiration date changed), the user of the integrated system can make changes internally, which is much easier.
- Profiling is recommended for low-power systems, which cannot support customers’ database. If so, all customer data is stored securely encrypted in the gateway. When choosing profiling as an option, you have to take into account that the API of the gateway does not support some non-financial features. For example, if you need to create a selection by certain criteria (e.g., by zip code), you will not be able to do this via API.
Detokenization and Deprofiling
For some business scenarios, a card/account number has to go through the reverse process for sensitive data to be pulled from a token. For this purpose, detokenization and deprofiling are used. These operations have the same nature and are performed via one API call.
Detokenization is a mechanism allowing to extract a card/account number from a token encrypted as a result of tokenization.
Deprofiling is a mechanism allowing to extract a card/account number from a token encrypted as a result of profiling.
Use case
1) GoodPlace merchant, which is a hotel, keeps payment information of the guests securely encrypted within its internal system. In cases when a guest requests a service that is not provided by the hotel (e.g., flower delivery), the merchant needs to obtain the card number of the guest to pay for the service. To not disturb the guest, their card data is extracted from the system via the detokenization operation.
2) EverydayTransaction merchant has an internal payment ecosystem where customers’ card data is stored. Customers may need to perform transactions through the external system of the company’s partners/vendors. The merchant cannot make transactions with an encrypted card number value externally. Technical incompatibilities make it impossible to integrate the internal and external systems together. To not have to request the card number from a customer, their card data is extracted from the internal system to be submitted to the external one. This is done via the detokenization operation.
The detokenization/deprofiling mechanism works as follows:
- For PCI purposes, if you need to perform detokenization/deprofiling, you have to address the issue to the gateway support.
Tokenization Policy
Depending on the needs, a PSP can assign merchants with a certain policy that controls how tokenization is done for a merchant. The following policies are available within the gateway:
- Tokenization and Detokenization - allows to both encrypt and decrypt card/account numbers via tokenization/detokenization.
- Tokenization Only - allows only to encrypt card/account numbers via tokenization.
- Profiling Only - allows only to encrypt card/account numbers along with additional customer data via profiling.
- Profiling and Deprofiling - allows to encrypt and decrypt card/account numbers along with additional customer data via profiling/deprofiling.
- Profiling Unique - allows only to encrypt card/account numbers along with additional customer data via profiling. When this policy is selected, customer data is saved in more than one token profile.
- Profiling Unique Deprofiling - allows to encrypt and decrypt card/account numbers along with additional customer data via profiling/deprofiling. When this policy is selected, customer data is saved in more than one token profile.
Retokenization and Untokenization
Some processors that support tokenization services (only TrustCommerce at the moment), provide the ability to update token data in cases when the payment information of a customer has been changed. For this purpose, retokenization is used.
Retokenization is a mechanism allowing updates to customer data associated with a previously tokenized card/account at processor’s side.
The retokenization mechanism works as follows:
Providers and processors, that provide the tokenization service, charge fees for every stored token. For this reason, it is not cost-effective to keep tokens associated with the cards/accounts of customers who do not perform transactions through the gateway and integrated systems anymore. The gateway provides the ability to remove unused tokens from the system. For this purpose, untokenization is used.
Untokenization is a mechanism allowing for the removal of tokens from the provider’s system through the gateway. Untokenization can be
configured in 2 ways:
- Manual - token deletion is allowed. To remove the token, submit the untokenization API call.
- Disabled - token deletion is not allowed.
Additionally, regardless of how untokenization is configured, you can address the issue to the gateway support requesting token deletion by certain criteria. In this case, tokens are removed via scripts run by the DevOps.