Introduction
The purpose of this guide is to familiarize users with the UniPay deployment process, its stages, involved products, verifications so they could be able to perform the deployment of the application from scratch.
Intended Audience
This guide will be useful for DevOps and system administrators who have started the deployment process of UniPay and need to know the exact steps on how to deploy the application.
UniPay Installation Instruction (Cluster)
Overview
To perform the UniPay deployment, make sure that you have filled out the questionnaire, which can be either
downloaded or provided by the support team, and have familiarized yourself with the
UniPay Deployment Configurations diagram. The following middleware is involved in the deployment process:
Nodes Preparation
1) Prepare servers using the parameters from the questionnaire (
number of servers, IP addresses, domains, etc). The OS on the servers should be installed with a minimum set of the system components (i.e., without any additional applications) because all necessary software will be installed when you run an Ansible script. If you install additional components on the servers, the Ansible script may not work properly.
Stuff you should know:
The number of nodes depends on how many transactions per second you expect to process. We recommend
configuring three nodes for UniPay/UniBroker, and two for sFTP/database. sFTP/DB nodes require more resources, so two is the minimum number.
For UniPay/UniBroker, an additional node is needed so the system can switch between the nodes in case of an issue. Thus, if one of the nodes fails, it can be restored by copying one of two remaining nodes. Since it’s impossible to make a copy of a server at high load, the node used as a backup will stop processing all requests as well. If there are only two nodes in the UniPay/UniBroker cluster and an issue arises on the second one, then both nodes stop serving requests. Thus, the whole cluster becomes unreachable.
Three-plus nodes cluster configuration allows the failover node to become the active one until the original node can be restored without any delays in request processing. Follow this
link for more information.
The maximum number of nodes you can use is nine, but we recommend starting with three because additional nodes can be added at any stage.
2) Configure the servers for different segments according to the questionnaire. Segmentation must be performed using special network equipment (router and/or switch). We recommend configuring the following network segments:
UniPay,
UniBroker,
Secure (see the
UniPay Deployment Configurations diagram document).
It is important:
You must use segmentation due to PCI reasons. Without it, you will not be able to pass a PCI audit.
3) Configure the endpoints according to the questionnaire. To configure the endpoints, make sure you have access to the router (
MikroTik, Cisco, F5, HAProxy, etc.). During the installation process, Internet access must be available on each node, and firewalls must be configured. The configuration of the servers (hardware/software) must comply with our recommended requirements specified in the UniPay Deployment Configuration document. Host names must correspond to those indicated in the questionnaire. For example:
- secure.domain.com on unibroker-entry
- portal.domain.com on unipay-entry
- sftp.domain.com on unisftp-entry
Setting Up The Nodes
- All steps below must be performed on all nodes.
- Install CentOS, release 7.х (Final).
- Install the OpenSSH server. This is a standard SSH server available for all distributions. We recommend using it because Ansible is configured to use OpenSSH, and our Ansible scripts configure OpenSSH. Additionally, node configuration and other cluster and application maintenance actions are performed using OpenSSH.
- At this time, only CentOS and OpenSSH server should be installed on the nodes, with no other software present.
- On CentOS, create an SSH user under the name uniadmin with sudo privileges. This is a superuser required to perform all subsequent UniPay installation steps. Make sure you use the same password for the uniadmin user on all nodes.
Stuff you should know:
To install UniPay according to the instructions, you need to connect to the node and log in. This requires SSH and a user with the necessary privileges (superuser), and this user is required for each node. You will not be able to proceed with the installation if you do not have access to the node.
Sudo Health Check
1) For sudo health check, perform the steps below using the admin node.
2) Using the SSH client and the uniadmin user, log in to a node.
3) Run the following command and enter the password of the uniadmin user:
sudo su -
4) If the previous command is executed successfully, run the following command:
id
5) If the actions were carried out successfully, the following result should be shown on the screen:
uid=0(root) gid=0(root) groups=0(root)
Node Configuration
1) All steps below must be performed on the admin node using the uniadmin user.
2) Using the command below, create the SSH keys to access the repositories. The keys must be created without a password. Recommended key format:
RSA, minimum bit number:
4096.
ssh-keygen -t rsa -b 4096
Stuff you should know:
SSH keys are used to access the UniPay source code repository and the Jenkins configuration repository, since the repositories are GIT-based and use the SSH protocol to transfer data. SSH authenticates a user via the private/public keys that you must generate. The private key is stored in your system while the public key must be sent to the gateway support team (for more details see the next step). SSH keys are the only keys that you generate manually. All other keys are generated automatically by the Ansible scripts during the installation process.
3) Send a public SSH key (
~/.ssh/id_rsa.pub file) to the gateway support team to access the repositories. After the public key has been sent, you will get the access to the repositories that contain the UniPay source code and the Ansible scripts.
4) Check the availability of repositories by running the SSH command for each repository using the URLs provided by the gateway support team via email. For example:
- ssh git@unitedthinkers.com:{clientName}-unipay.git
- ssh git@unitedthinkers.com:{clientName}-jenkins.git
5) Run the commands below to install the required software. When executed, the EPEL repository and the Ansible automation system are added to your system.
sudo rpm -ivh http://dl.fedoraproject.org/pub/epel/6/x86_64/epel-release-6-8.noarch.rpm
sudo yum install -y git ansible
6) Run the following command to get the GIT copy from the repository:
git clone --recursive git@unitedthinkers.com:-jenkins.git jenkins
7) Go to the installation scripts directory:
cd jenkins/common
# git checkout master && git pull
8) Run the following command to create a temporary directory:
mkdir tmp
9) Open the jenkins/common directory and edit the inventory file according to the questionnaire.
Stuff you should know:
Inventory is a file with a set of parameters, on the basis of which our scripts work. You need to edit this file according to the desired configuration. The inventory file contains the system configuration, groups, and services, i.e., how many nodes each cluster will have, what will be configured on the nodes, on which domain names, etc.
10) Create the
tmp/certificate.crt file containing the ca-bundles (certificate chain up to the root certificate) and the private key in the
PEM format.
Stuff you should know:
HTTPS requires private/public keys. A certificate is a public key signed by the certification authority. A private key is a key in PEM format that is generated along with the public key. When you open a session, the public key is sent to the client and is used to encrypt data that is transmitted over the network. It is used to verify that the client has connected to a genuine site, and not to a fake one.
11) Run the following command to create a file with a master password to access the password vault:
tmp/vault_password_file
Stuff you should know:
The password vault is an encrypted file containing passwords. It is encrypted so that it can be stored in not very reliable places (for example, on a flash drive or cloud).
12) Run the command below to create a file with the passwords. We recommend avoiding the use of $$ symbols, since this can lead to problems with configuration.
ansible-vault create passwords
Stuff you should know:
The passwords file includes the password for keystore that is going to be created during the deployment process via the ansible script. For security reasons, we highly recommend to use different passwords for UniPay and UniBroker.
13) To view the cluster passwords, connect to the admin node over SSH and go to the
jenkins/common directory by running the following command:
cd jenkins/common
14) To get the necessary password, open the passwords editor from the
jenkins/common directory by running the following command:
ansible-vault edit passwords
Checks Before UniPay Installation
1) Run the following command to perform connectivity check:
ansible -m ping nodes -e @passwords
2) Run the following command to perform privileges accessibility check:
ansible -m ping nodes -e @passwords -b
UniPay Installation Scripts Running
1) Using the command below, run a script that launches the software installation and configuration process. If you have performed the previous steps correctly, the following outcome is expected:
- clean database is installed;
- replication is configured on the database;
- the rest of the application components are installed (UniPay, UniBroker, sFTP, Jenkins on admin node, HAProxy, KeepAlived, etc.).
ansible-playbook site.yml -e @passwords
Stuff you should know:
The entire installation process is logged. Log example: screenshot
2) Run the following command to perform the endpoint check:
ansible -m ping entries
It is important:
When configuring UniPay, you must use a local DNS (hosts file). External DNS servers are not recommended, because if problems arise on the external DNS server, they arise on the entire cluster.
Checks After UniPay Installation
- Open a browser and enter the UniPay URL, for example: https://portal.client.com.
- If UniPay has been installed correctly, you will be prompted to enter a password.
- If the page is not opened, the database is not fully initialized. In this case, enter an URL with the following path: https://portal.client.com/init. In this case, you will see the initialization page of a merchant, user, etc.
If all steps have been performed correctly, after running the scripts, you will get UniPay with a configuration that corresponds to the data in the questionnaire and Inventory file installed on a cluster.
Cluster Reinstallation
If the cluster was installed with incorrect settings (for example, wrong parameters were indicated in the inventory file), you can reinitialize the cluster to reset all settings but keep JBoss running at the same time.
It is important:
A cluster reinstallation process result in the loss of complete information stored in the database and of the processing files. This procedure can be performed safely only in test environment or during the initial Unipay installation. If you are not sure if you should apply this procedure in your situation, contact gateway support
You should follow these steps to reinitialize the cluster:
1. Stop JBoss on Unipay and Unibroker nodes via the
101- Stop Jboss Jenkins job.
2. Remove the content of
/opt/unipay/* and
/opt/unibroker/* folders:
- go to /opt/unipay/* folder and run this command on each of the Unipay nodes:
rm -rf /opt/unipay/*
- after removing all the content of the folder, run csync2 -xv command on each of the nodes and wait until the synchronization is completed successfully.
- repeat the items described in step 2 for /opt/unibroker/* folder on each of the Unibroker nodes.
3. Delete all information from MySQL database with the following command:
mysql -e 'drop database unipay'
4. Launch cluster installation with the ansible script:
ansible-playbook site.yml –e @passwords ?
Admin Node Manual
The purpose of this document is to provide the user manual explaining how to perform tasks using the admin node. It contains descriptions of the operations and parameters available when the admin node is installed as well as the procedures that have to be executed to restart the server.
Jenkins Jobs Definition
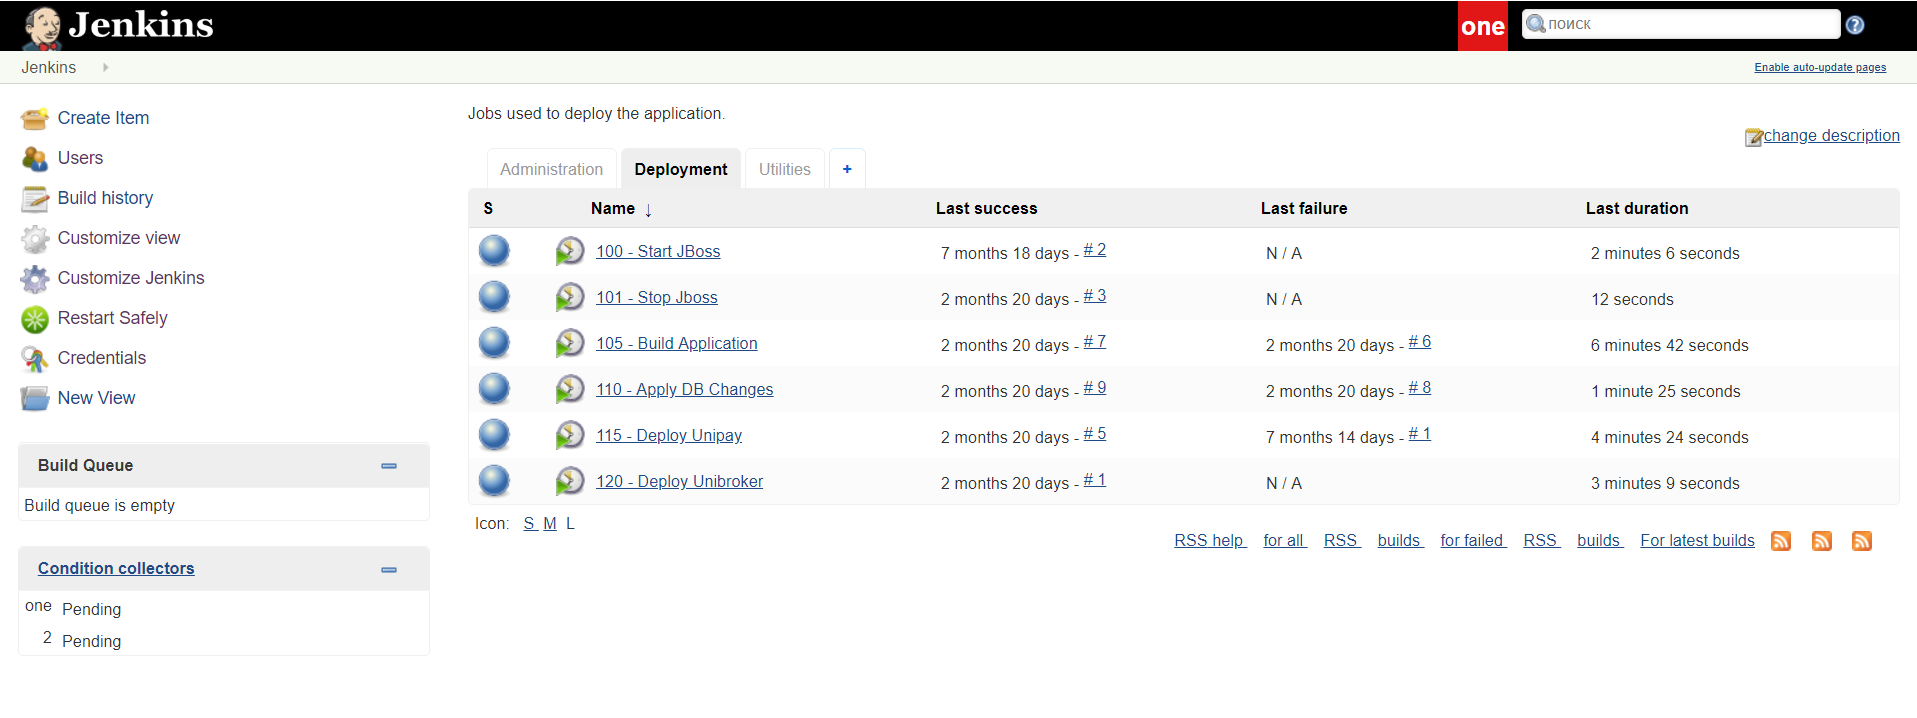
Deployment
Includes operations used to deploy the application.
- 101 - Start JBoss – job used to start JBoss on the selected UniPay/UniBroker node(s). Used for updates and patches only.
- NODES_GROUP – allows selection of group of nodes which will be affected by the starting of the JBoss service. To learn more about the parameter, see the section below.
- 102 - Stop Jboss – job used to stop JBoss on the selected UniPay/UniBroker node(s). Used for updates and patches, before the Apply DB Changes job.
- NODES_GROUP – allows selection of group of nodes which will be affected by the stopping of the JBoss service. To learn more about the parameter, see the section below.
- 105 (legacy 110) - Build Application – job used to download a branch from the GIT repository and build UniPay and UniBroker modules. Used for updates and patches only. All parameters (branch, profile name, etc) are set in inventory configuration file.
- 110 (legacy 120)- Apply DB Changes – job used to update a current database. Used for updates and patches only.
- MIGRATION_SCHEMA – allows selection of how the system will migrate from the current database to the updated one. Used only for large databases, when the system has to be stopped for 20 or more minutes for the database to be updated.
Note: currently, only
no migration radio button can be selected.
- EXECUTE_PINGDOM - allows to run the application performance and availability check.
- 115 (legacy 130) - Deploy Unipay – job used to deploy UniPay and its components to the selected node(s). Used for updates and patches only.
- NODES – allows selection of one or more nodes in UniPay cluster environment which will be affected by the redeploy occurring as part of this process.
- RESTART_JBOSS – indicates that JBoss will be stopped prior to deployment and started after that. Required if REDEPLOY_UNIPAY parameter is selected
- ARCHIVE_LOGS – indicates that all logs will be compressed by gzip after JBoss will be stopped, if RESTART_JBOSS parameter is selected. REDEPLOY_UNIPAY – indicates that UniPay will be redeployed during the deployment process using UniPay rebuild, which was built from sources downloaded from a repository. IF CHECKED OFF, RESTART_JBOSS MUST BE SELECTED.
- REDEPLOY_REPORTS – indicates that report templates will be redeployed during the deployment process.
- REDEPLOY_CAMEL – indicates that Camel will be redeployed during the deployment process.
- REDEPLOY_UTIL – indicates that additional utilities will be redeployed during the deployment process.
- REDEPLOY_UNIREAD – indicates that UniRead module (used for terminal transactions processing through the Cloud) will be redeployed during the deployment process.
- 120 (legacy 140) - Deploy Unibroker – job used to deploy UniPay and its components to the selected node(s). Used for updates and patches only.
- NODES – allows selection of one or more nodes in the UniBroker cluster environment which will be affected by the redeploy occurring as part of this process.
- RESTART_JBOSS – indicates that JBoss will be stopped prior to deployment and started after it. Required if REDEPLOY_UNIBROKER parameter is selected.
- ARCHIVE_LOGS – indicates that all logs will be compressed by gzip after JBoss is stopped, if RESTART_JBOSS parameter is selected. **REDEPLOY_UNIBROKER – indicates that UniBroker will be redeployed during the deployment process using UniBroker rebuild, which was built from sources downloaded from a repository. IF CHECKED OFF, RESTART_JBOSS MUST BE SELECTED.
- REDEPLOY_CAMEL – indicates that Camel will be redeployed during the deployment process.
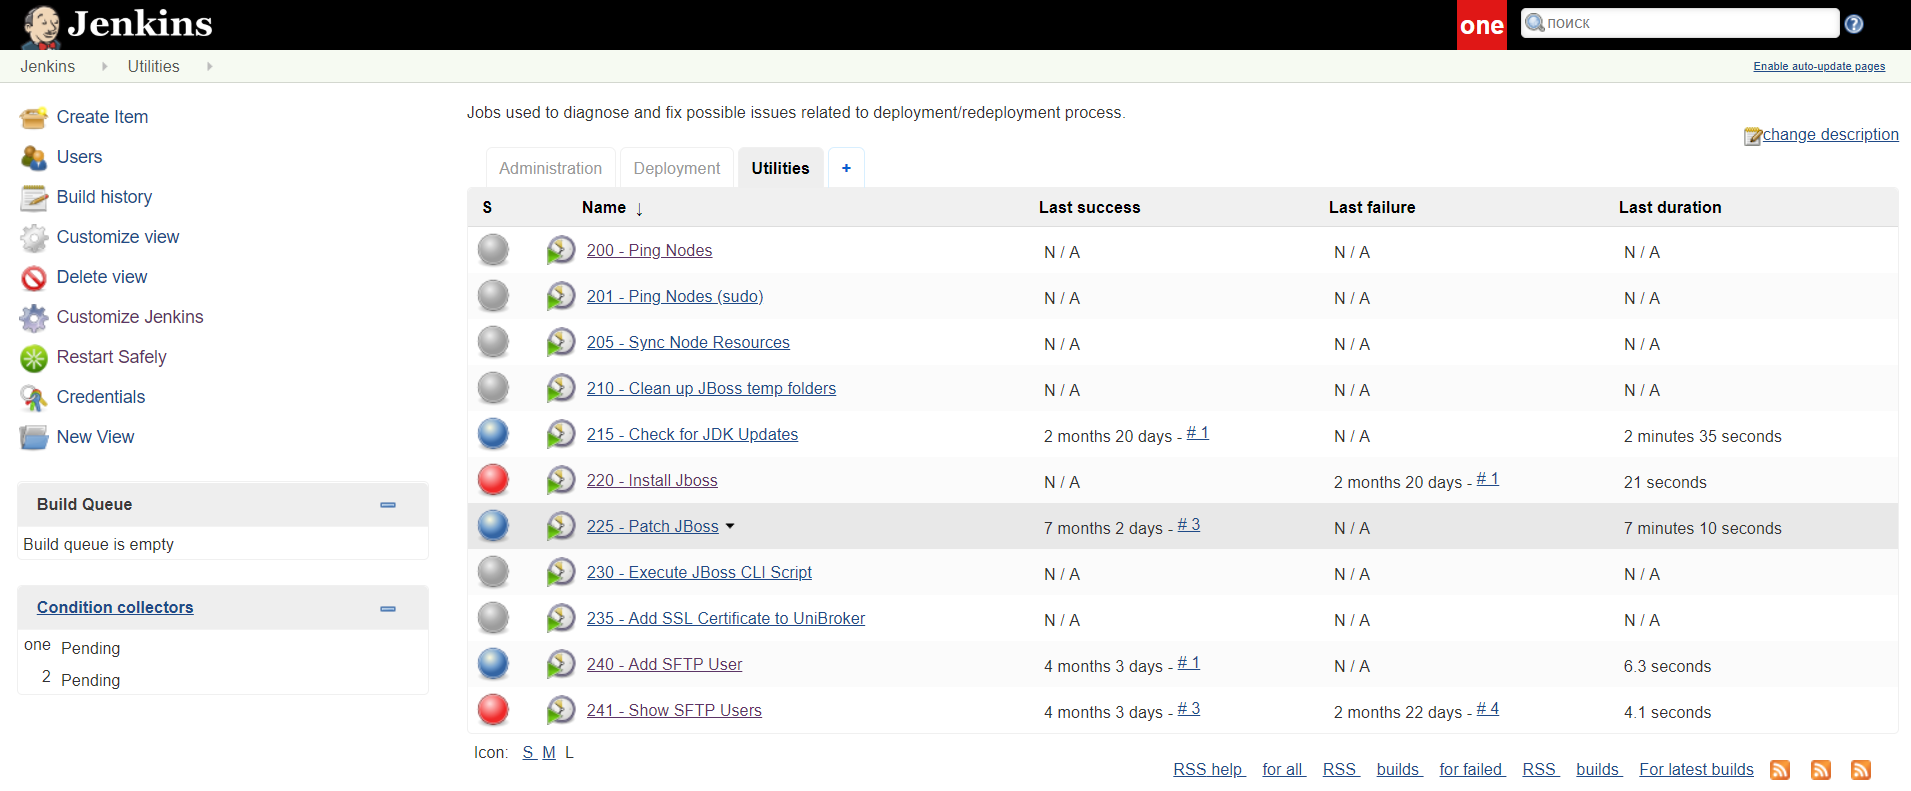
Utilities
Includes operations used to diagnose and fix possible issues related to deployment/redeployment process.
- 200 (legacy 100) - Ping Nodes – job used to check the connection between the admin and the selected node via SSH. Must be used prior to updates/patches, when a particular issue arises, or when there is a delay between the checks. Result of the ping is displayed in the Build Log.
- NODES_GROUP – allows selection of group of nodes which will be affected by the executed ping. To learn more about the parameter, see the section below.
- 201 - Ping Nodes (sudo) – job used to check the connection between the admin and the selected node via SSH, as well as check superuser privileges availability. For example, if 200 - Ping Nodes shows that everything is fine, you can use 201 - Ping Nodes (sudo) to see whether there is a problem with privileges. Must be used prior to updates/patches, when a particular issue arises, or when there is a delay between the checks. Result of the ping is displayed in the Build Log.
- NODES_GROUP – allows selection of group of nodes which will be affected by the executed ping. To learn more about the parameter, see the section below.
- 205 (legacy 210) - Sync Node Resources – job used to synchronize resources between the selected nodes via csync2 tool. The job runs csync2 –xv command on the selected nodes. When run, csync2 tool performs file reconciliation and necessary synchronization. Used for diagnostic purposes. By default, the job is run automatically, but can be run manually, if needed.
- NODES_GROUP – allows selection of group of nodes which will be affected by the executed synchronization. To learn more about the parameter, see the section below.
- 210 (legacy 220) - Clean up JBoss temp folders – job used to clean up legacy files and temporary folders.
- INCLUDE_ARCHIVE_FOLDER – indicates that the archive folder, which stores archived copies of merchants’ digital resources, such as merchant statements, will be cleaned up.
- ARCHIVE_FOLDER – location of the archive folder. This parameter is read-only. If you need to change it, address the issue to the gateway support.
- INCLUDE_LOG_FOLDER – indicates that the log folder, which stores various log files, will be cleaned up.
- LOG_FOLDER – location of the log folder. This parameter is read-only. If you need to change it, address the issue to the gateway support.
- INCLUDE_WORK_FOLDER – indicates that the work folder, which stores temporary application files, will be cleaned up.
- WORK_FOLDER – location of the work folder. This parameter is read-only. If you need to change it, address the issue to the gateway support.
- STORAGE_PERIOD – maximum file age in days. Any files within the log, work and archive folders that are older than the specified number of days will be removed.
- 215 (legacy 300) - Check for JDK Updates – job used to update Java Development Kit. The job verifies if JDK update is available in the Ubuntu repository (for Ubuntu) or distribution repository (for CentOS). If available, it downloads and installs the new version of JDK. Used each time the new java version is released and during updates/patches.
- NODES_GROUP – allows selection of group of nodes which will be affected by executed JDK updates check. To learn more about the parameter, see the section below.
- 220 (legacy 310) - Install Jboss – job used to install a new JBoss version or to re-configure the current one.
- NODES_GROUP – allows selection of group of nodes which will be affected by JBoss installation. To learn more about the parameter, see the section below.
- 225 (legacy 320) - Patch JBoss – job used to update a current JBoss version with available patch.
- NODES_GROUP – allows selection of group of nodes which will be affected by JBoss patching. To learn more about the parameter, see the section below.
- PATCH_FILE – allows selection of a patch file that must be used for JBoss update.
- 230 (legacy 330) - Execute JBoss CLI Script – job used to run a JBoss CLI script for configuring JBoss settings (for example, a number of available loggers and access policy for them) without stopping JBoss. Used in cases of emergency.
- NODES_GROUP – allows selection of group of nodes which will be affected by the executed JBoss CLI script. To learn more about the parameter, see the section below.
- SCRIPT – content of the JBoss CLI script that should be executed.
- 235 (legacy 340) - Add SSL Certificate to UniBroker – job used to add a certificate for UniBroker host to the truststore. After the certificate is added, JBoss has to be restarted. Note that if the host, specified in the certificate, does not correspond to the real one, UniBroker will not be run.
- CERTIFICATE_ALIAS – name of the certificate. Name of a certificate must be unique; usually, it corresponds to the host name. NOTE: If CERTIFICATE_ALIAS is set as hostname:port and CERTIFICATE_DATA is not specified, a certificate will be downloaded automatically from the specified hostname: port.
- CERTIFICATE_DATA – the content of the certificate.
- 240 - Add SFTP User - job used to create a new user on the SFTP server.
- 241 - Show SFTP Users - job used to get a list of SFTP users.
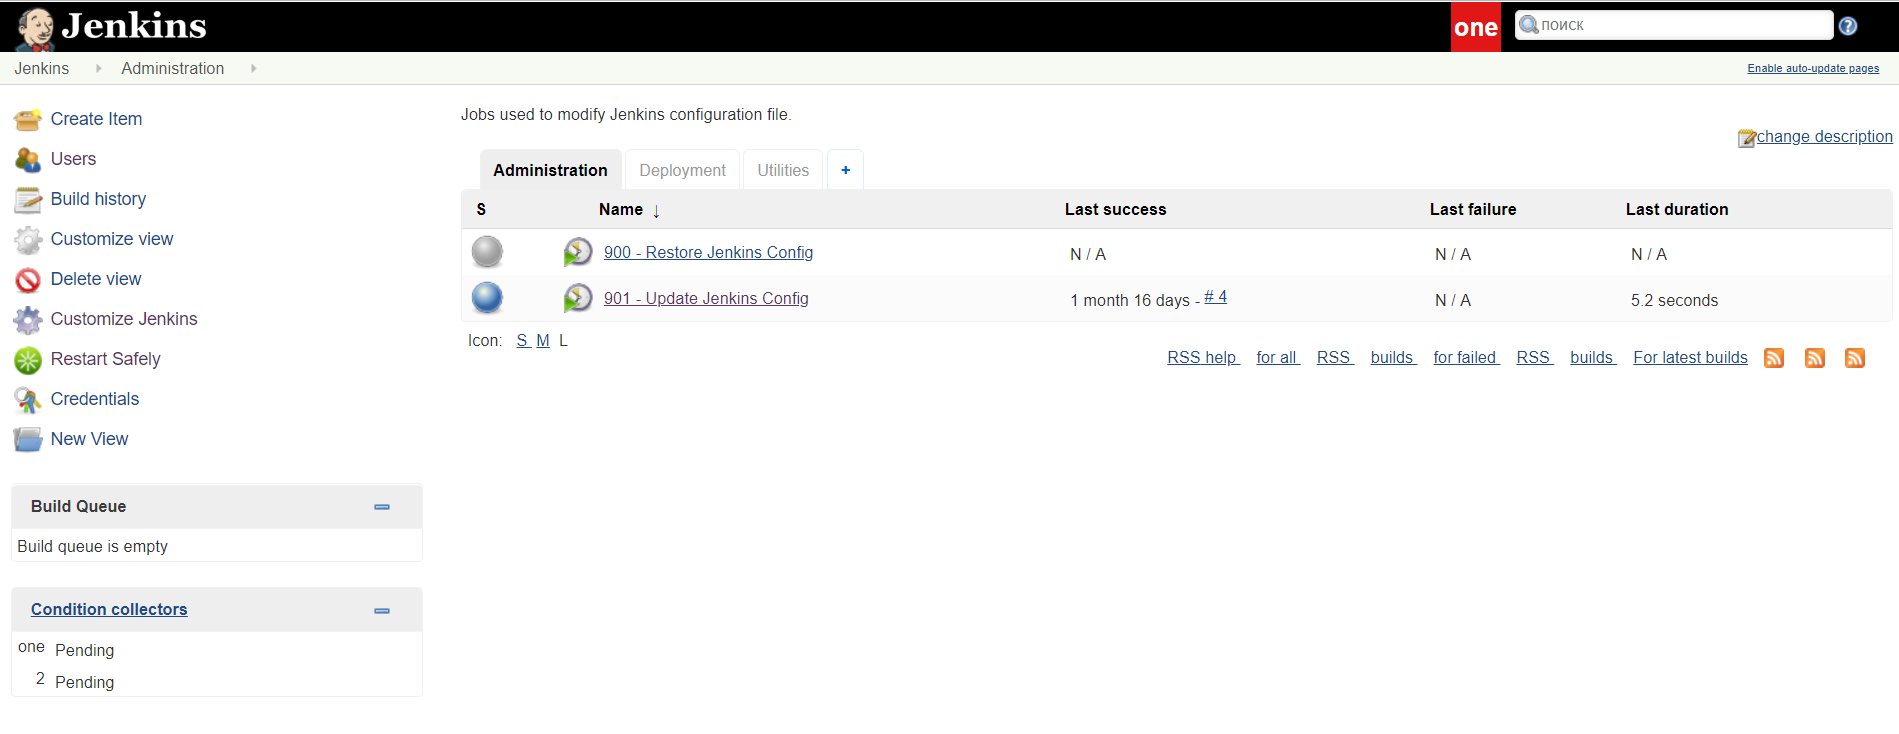
Administration
Includes operations used to modify the Jenkins configuration file.
- Restore Jenkins Config - restores a current Jenkins configuration.
- Update Jenkins Config - updates Jenkins configuration from the repository, if an update is available.
Nodes Group Parameter
Jenkins jobs can be applied to either individual nodes or a group of nodes. Nodes groups are defined in the inventory file, which is used in conjunction with the ansible scripts for UniPay deployment.
The following groups are available at the moment:
- unipay-entry - UniPay master node entry;
- unipay - includes all UniPay nodes;
- unibroker-entry - UniBroker master node entry;
- unibroker - includes all UniBroker nodes;
- uniadmin-entry - UniAdmin node entry;
- uniadmin - UniAdmin node;
- jboss-entry-nodes - includes unipay-entry and unibroker-entry;
- jboss-nodes - includes all nodes where JBoss is installed (unipay-nodes and unibroker-nodes);
- java-entry-nodes - includes jboss-entry and uniadmin-entry;
- java-nodes - includes all nodes where Java is installed (jboss-nodes and uniadmin-node);
- nodes - includes all nodes in java-entry-nodes and java-nodes groups.
Note that all entry groups are used only for Ping Nodes jobs.
Jenkins Configurations Update
Jenkins server configuration issues are among other system issues that may occur while working with the gateway in the following situations:
1) In the process of the hotfix, update, or install;
2) In case when the new logic of deployment was added in the new release;
3) In case when the new functionality was added to Jenkins.
In order to identify the issue with the configuration, you should log in to the server under
uniadmin user and run
git status command in
~/jenkins folder. In the output, you’ll get the list of configuration files that have been changed for further investigation.
In case any issues were identified, you should perform
update of Jenkins configurations.
Make sure that you have followed these steps before performing Jenkins configurations update:
- contact the gateway support team - open the corresponding ticket to agree that the update has to be performed in the specified date and time;
- confirm with the support team, whether any additional specific steps not mentioned in this instruction are required in your case;
- perform the update in the agreed date and time following the standard procedure;
- back up ~/jenkins directory (optional step).
Standard procedure of the Jenkins configurations update
In order to update Jenkins you can use one of the following methods:
1) Run the following command using any SSH client program:
cd ~/jenkins
git pull
sudo service jenkins restart
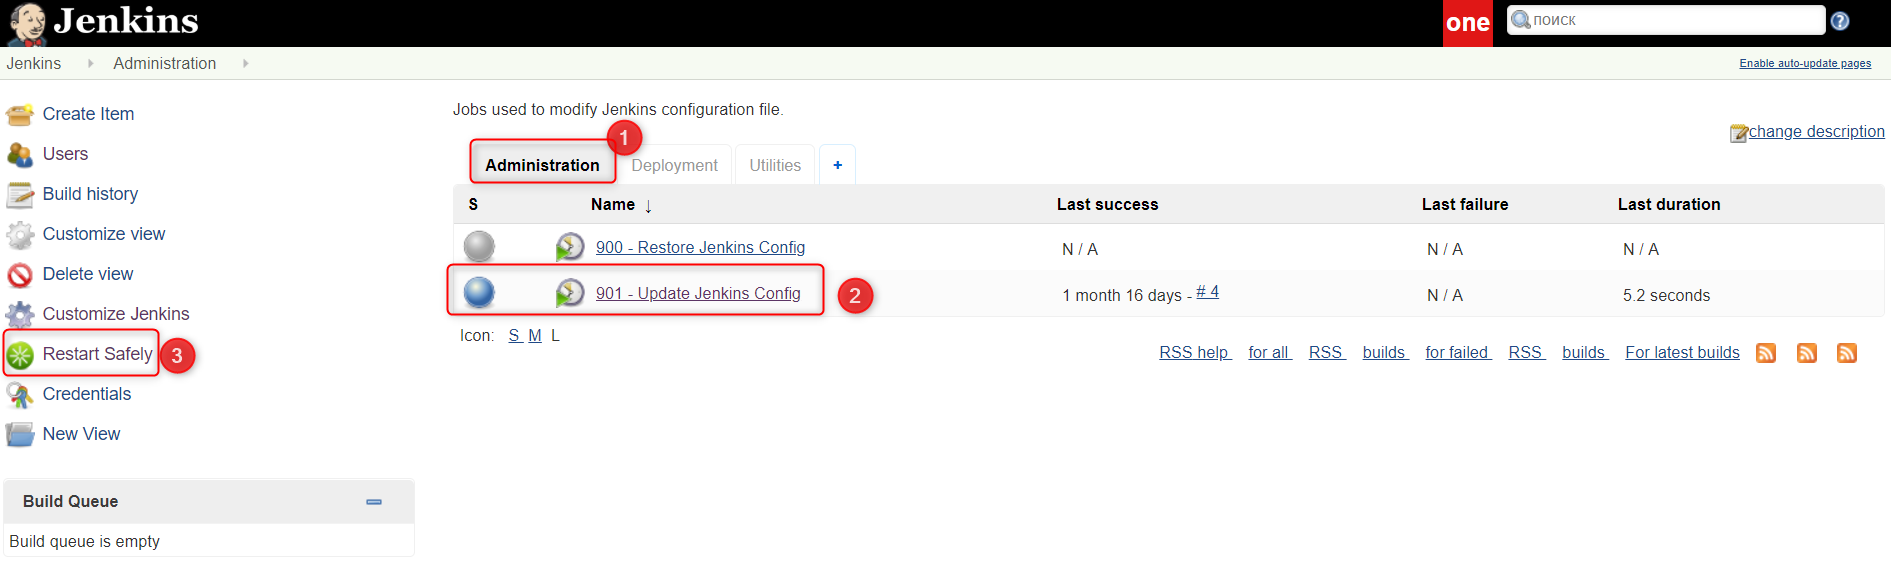
2) Perform Jenkins configurations update by running jobs used to modify the Jenkins configuration file (Jenkins Menu):
- navigate to Administration tab in Jenkins menu;
- run command 901 (Update Jenkins Config);
- restart the server using Restart Safely command in the system menu.
In case the update was successful, the console output after step 2 is
as follows:
Started by user unknown or anonymous
Building in workspace /opt/uniadmin/jenkins
[jenkins] $ /bin/bash -e /tmp/jenkins1090296320510734580.sh
Warning: Permanently added 'unitedthinkers.com,23.92.222.254' (ECDSA) to the list of known hosts.
Already up to date.
Finished: SUCCESS
Verification
If all the steps were performed correctly, you’ll be able to log in to the Jenkins menu on the server without any issues.
If Jenkins configurations update was performed unsuccessfully, you’ll be unable to login in Jenkins menu. In that case, you should follow one of these steps:
- review Jenkins log, analyze and address the issues;
- contact the gateway support team;
- restore the previous version of the software from the backup if needed.
Deployment Instruction
Terminology
- outage – a period when the UniPay application is unavailable.
- hotfix - deployment of a fixed version of the application. The changes are made exclusively in Java, without SQL being touched. No outage is applied.
- patch - deployment of a fixed version of the application. Changes can be made both in Java and SQL (data modification in the database or creation of new SQL tables). A short-term outage (2-3 min) is possible.
- update - deployment of a new/enhanced version of the application. Changes are made both in Java and SQL (database structure is modified). A
long-term outage (20-30 min) is required to complete the update.
Preliminary Steps
- To perform hotfix/patch/update, you must go through the corresponding training, conducted by the gateway support. If the training is needed, request it via the designated form. Make sure that you have specified the desired deployment level (hotfix/patch/update) in the request. Be advised that trainings can take up to 1-2 weeks.
- Every time a new hotfix/patch/update is available, you receive an email with the release notification, which contains necessary technical information. Make sure you have received such an email before the deployment. If you have not received the email notification about the expected employment, request it from the gateway support.
- Confirm the hotfix/patch/update deployment time with UT team. This is needed for cases when an outage is going to be present so UT team will not react to the notifications about server being unavailable.
After preliminary steps are done, the server can be deployed.
Deployment Actions
During the hotfix/patch/update, build and deployment of the application are performed. As a part of the deployment, certain actions may be required from your end for hotfix/patch/update to be made correctly.
These actions can be pre- or post-deployment. For example:
- Pre-update action - execute a particular CLI script to skip additional node restart;
- Post-update action - modify provider-profile-defaults.properties file and replace all $$ characters with ss.
Deployment
For a hotfix:
- Update the admin node via the Administration/Update Jenkins Config Jenkins job.
- Run build via the Deployment/110 - Build Application Jenkins job.
- Complete pre-update actions if available (a list of pre-update actions is provided by the UT team – if nothing is provided, there is no pre-update actions).
- Deploy UniPay via the Deployment/130 - Deploy Unipay job. All parameters (except REDEPLOY_UNIREAD and REDEPLOY_UTIL, if Cloud and Util are not used within the system) have to be checked off.
- Deploy UniBroker via the Deployment/140 - Deploy Unibroker job. All parameters have to be checked off.
- Complete post-update actions if available (a list of post-update actions is provided by the UT team - if nothing is provided, there is no post-update actions).
For a patch/update:
- Update the admin node via the Administration/Update Jenkins Config Jenkins job.
- Run build via the Deployment/110 - Build Application Jenkins job.
- Complete pre-update actions if available (a list of pre-update actions is provided by the UT team - if nothing is provided, there is no pre-update actions).
- Stop the JBoss service on all unipay and unibroker nodes via the jenkins Deployment/102 - Stop Jboss job.
- Run Deployment/120 - Apply DB Changes Jenkins job.
- Deploy UniPay via the Deployment/130 - Deploy Unipay job. All parameters (except REDEPLOY_UNIREAD and REDEPLOY_UTIL, if Cloud and Util are not used within the system) have to be checked off.
- Deploy UniBroker via the Deployment/140 - Deploy Unibroker job. All parameters have to be checked off.
- Complete post-update actions if available (a list of post-update actions is provided by the UT team - if nothing is provided, there is no post-update actions).
Verification
When deployment is done, make sure that changes have been applied successfully and the server is updated to certain version and revision. To do this, run the application, open the
System form on the
System perspective and check whether the values specified in the email received prior to hotfix/patch/update are present within the form.
For a hotfix:
To verify that deployment has been completed successfully, check the
Implementation-Version field via the System form on the System perspective. Deployed version of the application has to be present in this field in the format [release].[revision]-[date], for example, 7.1.1911296a34-b20180503.
For a patch/update:
To verify that deployment has been completed successfully, check the
Version and
Implementation-Version fields via the System form on the System perspective. Deployed version of the application has to be present in the Implementation-Version field in the format [release].[revision]-[date], for example, 7.1.1911296a34-b20180503. The version of the last applied database delta has to be present in the Version field, for example, 31288
Self-Deployment Training
Preliminary Steps
- Request the self-deployment training via the designated form. Make sure that you have specified the desired deployment level hotfix/patch/update) in the request. Be advised that trainings can take up to 1-2 weeks.
- Confirm the time of the self-deployment training with UT team.
After preliminary steps are done, the training can be started.
Deployment
For a hotfix:
- Update the admin node via the Administration/Update Jenkins Config Jenkins job.
- Run build via the Deployment/110 - Build Application Jenkins job.
- Deploy UniPay via the Deployment/130 - Deploy Unipay job. All parameters (except REDEPLOY_UNIREAD and REDEPLOY_UTIL, if Cloud and Util are not used within the system) have to be checked off.
- Deploy UniBroker via the Deployment/140 - Deploy Unibroker job. All parameters have to be checked off.
For a patch/update:
- Update the admin node via the Administration/Update Jenkins Config Jenkins job.
- Run build via the Deployment/110 - Build Application Jenkins job.
- Stop the JBoss service on all unipay and unibroker nodes via the jenkins Deployment/102 - Stop Jboss job.
- Run Deployment/120 - Apply DB Changes Jenkins job.
- Deploy UniPay via the Deployment/130 - Deploy Unipay job. All parameters (except REDEPLOY_UNIREAD and REDEPLOY_UTIL, if Cloud and Util are not used within the system) have to be checked off.
- Deploy UniBroker via the Deployment/140 - Deploy Unibroker job. All parameters have to be checked off.
Verification
When deployment is done, make sure that changes have been applied successfully and the server is updated to certain version and revision. To do this, run the application, open the
System form on the
System perspective and check whether the values specified in the email received prior to hotfix/patch/update are present within the form.
To verify that self-deployment has been completed successfully, check the following fields:
- Implementation-Version field. Deployed version of the application has to be present in this field in the format [release].[revision]-[date], for example, 7.1.133f72eb6b-bug-b20180919.
- Practice Data field. Sequential number of a example, 1 | 1. field. Sequential number of a hotfix/patch/update has to be present in this field, for example, 1 | 1.
Server Restart Instruction
The procedures below describe how JBoss has to be restarted. Other approaches can lead to the data loss and malfunctioning of the admin node services after restart is done.
Preliminary Steps
If there is a suspect of the memory leak in JBoss, follow the steps below. Otherwise, please skip them.
To verify that memory leak is present, check the logs (search for the
OutOfMemoryError) or the corresponding diagrams in the JavaMelody service. If present, follow these steps before the server restart:
1) Run the command to generate classes taking the most memory:
jcmd $PID GC.class_histogram > /tmp/class_histogram.txt
2) Run the command to generate the heap dump:
jcmd $PID GC.heap_dump /tmp/heap_dump.hprof
3) Run the command to generate the thread dump:
jcmd $PID Thread.print >/tmp/threads.txt
4) Archive generated files and send to the gateway support team for further analysis.
JBoss restart via Jenkins (admin node available)
1) Select
Manage Services (UniBroker) or
Manage Services (UniPay) respectively under the
Management tab.
2) Check off the nodes that should have JBoss restarted under the
Nodes section.
3) Check off
unibroker-jboss7 or
unipay-jboss7 respectively under the
Services section.
Note: Please contact support if another JBoss version is used in your configuration.
4) Select
Restart under the
Action section.
5) Click
Build button.
JBoss restart via Linux console (no admin node available)
1) To restart JBoss on UniPay particular node, run the command below:
service unipay-jboss7 restart
2) To restart JBoss on UniBroker particular node, run the command below:
service unibroker-jboss7 restart
Graceful JBoss shutdown via Linux console (no admin node available)
1) To stop JBoss, run the command below:
jboss-cli.sh --connect --command=":shutdown"
2) To start JBoss, run the command specific to the daemon that you have set up for JBoss.
It is important:
In the process of database nodes restart, MySQL server is restarted as well. Note that after the database server restart, replication is not started automatically. Thus, you should verify if database replication is up and running with
SHOW SLAVE STATUS\G MySQL statement and restart it manually with
START SLAVE command if necessary. See
Database Replication Manual Restoration instruction for more information.